CategoryUncategorized

Khalil’s words on Pain

the-prophet

Your pain is the breaking of the shell that encloses
your understanding.

Even as the stone of the fruit must break, that its
heart may stand in the sun, so must you know pain.

And could you keep your heart in wonder at the
daily miracles of your life, your pain would not seem
less wondrous than your joy;

And you would accept the seasons of your heart,
even as you have always accepted the seasons that
pass over your fields.

And you would watch with serenity through the
winters of your grief.

Much of your pain is self-chosen.

It is the bitter potion by which the physician within
you heals your sick self.

Therefore trust the physician, and drink his remedy
in silence and tranquillity:

For his hand, though heavy and hard, is guided by
the tender hand of the Unseen,

And the cup he brings, though it burn your lips, has
been fashioned of the clay which the Potter has
moistened with His own sacred tears.

~ Khalil Gibran

Google’s Visual Pattern Matching

DeepDream – a code example for visualizing Neural Networks

via Gizmodo article on DeepDream

Journey through the layers of the mind from Memo Akten on Vimeo.

Learning the Differences

After a while you learn the subtle difference
Between holding a hand and chaining a soul,
And you learn that love doesn’t mean leaning
And company doesn’t mean security.
And you begin to learn that kisses aren’t contracts
And presents aren’t promises,
And you begin to accept your defeats
With your head up and your eyes open
With the grace of a woman, not the grief of a child,
And you learn to build all your roads on today
Because tomorrow’s ground is too uncertain for plans and futures have a way of falling down in mid-flight.
After a while you learn…
That even sunshine burns if you get too much.
So you plant your garden and decorate your own soul,Instead of waiting for someone to bring you flowers.
And you learn that you really can endure…
That you really are strong
And you really do have worth…
And you learn and learn…
With every good-bye you learn.

~ Jorge Luis Borges ~

Blender Day 18 – Misc Stuff

plane_sizes
Blender Guru’s article on getting rid of “fireflies” looks to be useful, as I dive deeper into the Cycles render engine.
http://www.blenderguru.com/articles/7-ways-get-rid-fireflies/

Paint Palettes addon will make texture and weight painting more simpler. Less jumping around in the menus.
http://wiki.blender.org/index.php/Extensions:2.6/Py/Scripts/Paint/Palettes

Second Life has lots of Blender users, which means lots of tips on skinning/weighting.
https://community.secondlife.com/t5/Mesh/Blender-The-Weighting-Game/td-p/1927927/page/2

This morning was spent reading through Oliver Villar’s Learning Blender book, on the topic of animation. Reading while talking notes. Now that I’ve got some colorized reference pages, and a character with a very simple rig all skinned up, it’s time to dive into Blender’s animation capabilities.

Blender Day 16 – Resizing UI

How I wish more software  developers put the effort in to make their user interfaces scale like this. Natural vision practitioners would be more successful. The “higher resolution equals smaller icons” way of thinking needs to shift… and it apparently has, thanks to smartphones.

Anyhow, take a look at this slick DPI setting, then grab Blender and play with it yourself.

Blender – 15 Days Later – Open Source is Home

opensourcesoftware
First question that most have is,

“What is open source? You mean free?”

Yes, it’s free and more.

Open source means that not only are you given the product, but you are given the blueprints as well. If you need to make changes, you have the ability to go in and change the software yourself (or find someone to do it for you). Thousands of copies/variations are out there floating on the Internet. Some flavours are simplified, some complicated, all are customized to various degrees. This means that even if you loose your copy of the product, another copy can always be found…    somewhere.

NO ONE SHOULD BE ABLE TO  TAKE AWAY YOUR TOOLS.

Web developers are very familiar with this concept, as may of their tools are open source. Some may use commercial software but, in the end, the media itself is open source. You only really need a text editor to do most everything for the web.

Some common things I hear whenever I mention Linux, Gimp, Blender or virtually anything that is open source:

“Because it’s free, it must not have powerful features.”

Over the past 6 years I have probably spent $15,000 on software. I own licenses to multiple versions of Photoshop, yet I still use GIMP because it loads super fast and I can install it on all my computers, or any machine I come to contact with (yes, it was me who installed it on your PC). There’s an unbelievable amount of online support from all over the world, and more tutorials than anyone could ever ask for.

“Linux is complex and the interfaces are confusing.”

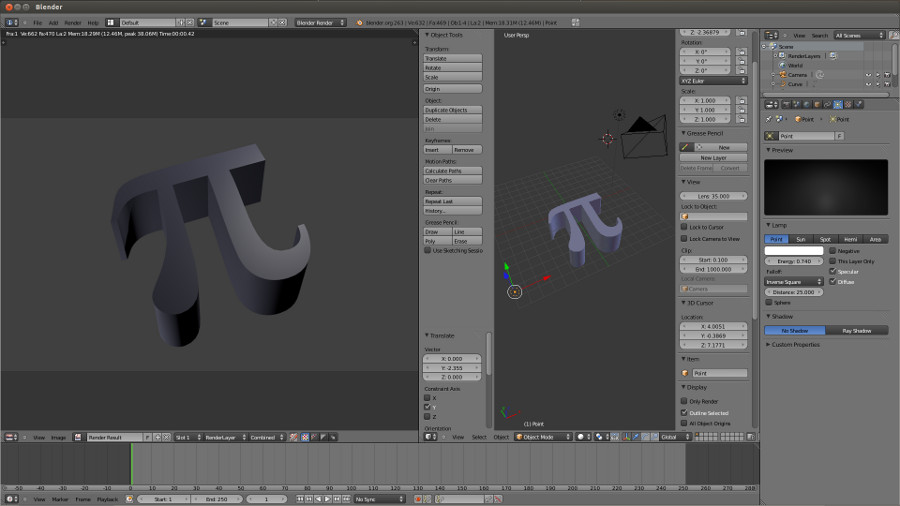
Most open source software, in the beginning, can be pretty crude. That being said, most of my multimedia applications have been around for a decade or two, and most of this software is pretty finely polished nowadays. All the open source applications I use are MUCH simpler than the commercial counterparts. In many cases, this simplicity was the primary reason I migrated to many of the free tools. As an example, look at how effectively Blender lets me scale the entire interface. I’ve personally never seen something like this. As for Linux being crude, take a look a this UI demo.

“Gimp, Blender and other open software is buggy.”

I honestly don’t see a difference, though if someone twisted my arm… I would say that commercial software tends to crash more on me that the open source counterparts.  This could be due to the fact that most of my commercial software is on Windows (sorry Microsoft) and that Linux is known to be more stable and recover well from crashes.  Problems are bound to happen and, because open source can be altered, problems are never true show-stoppers. You are probably not alone if you are having trouble, so the answer is almost always already out there to be discovered.

“No professionals use open source software.”

Take a look at the following image.

Portrait-of-Charles-Darwin_by-David-Revoy

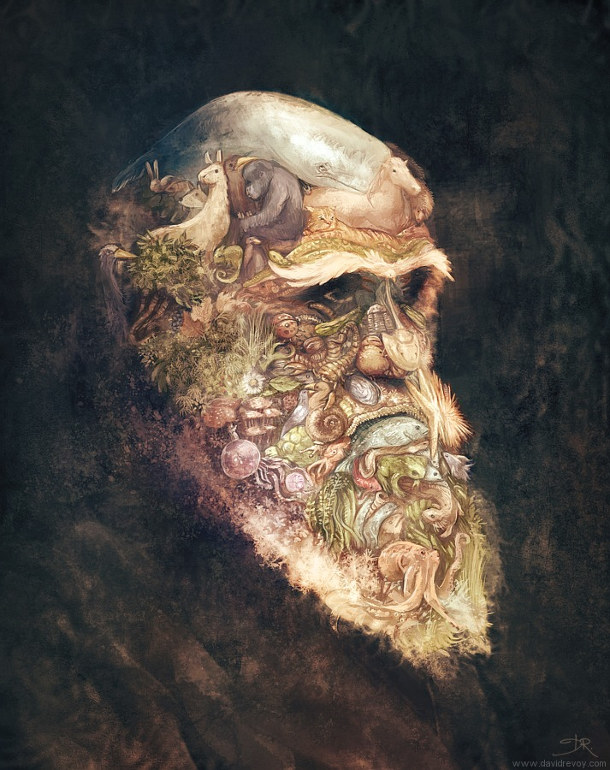
Darwin by David Revoy

This was created by David Revoy, an artist that has been using open source software for 100% of his work. He uses GIMP, Krita, MyPaint, Blender, all running under Linux. While it used to be a pain to find compatible hardware for Linux…   it’s pretty simple nowadays. Personally, I find that nearly all my devices (including my Wacom drawing tablet) were working without having to download or setup drivers. Real *cough* plug-n-play.

David shares why he chose to go to open source, back in 2009.

Am I happy about this personal choice ? Yes 🙂 and I can without any remorse put my old software license in a box for long term storage, just to show to my ( hypothetic and not yet existing )  grant-children what were …. the proprietary 2D software I started with.

To become more familiar with David Revoy’s work, I highly recommend purchasing his “Chaos and Evolutions” DVD.  If you can’t afford the purchase right now, he’s made the video available on Youtube. He’s using some of the software mentioned above, including Alchemy (tool that Android Jones assisted the develop of).

As I mentioned before, I’ve easily spent $15,000+ on software over the past 6 years (since going independent). I’m putting energy into open source tools because of my own personal issues with licensing commercial software, as well as issues I’ve witnessed my clients struggling with.

I am not saying that commercial software isn’t needed, I’m just saying that it should not be the foundation of a creative production. If the core of a project is open source, this means that all the base products will be available to everyone on the project. If animators want to do a bit of audio testing with their animations, they have Audacity to do some light sound editing of their own.  If a project manager wants to make some slick diagrams in Inkscape, a tool is available to them without spending a few hundred on Adobe Illustrator.

Please keep in mind.  These software are not trying to clone commercial software applications. They have developed and grown over the years, based on feedback from users all around the world. There’s always a learning curve but, like when you learned touch-typing, you’ll be zipping along faster than before, once you get over the initial hump.

Not convinced? Perhaps you have preconceptions based on what you saw 5-6 years ago.  Well, I’m here to tell you that times have changed. Checkout Vimeo and Youtube for some tutorials and you’ll be amazed at what you find. If you’re fortunate enough, perhaps the Vimeo video has a “Download” option available. If that’s the case, then you can save a local copy and watch the video in VLC, where you can use the “[” and “]” keys to control the speed of the tutorial.  I typically run at 130-150% of normal speed.  😉

If you’ve got your checkbook out, you might want to support the current Krita Kickstarter. They’re planning on adding animation functionality, amongst other features.

Blender Day 13, 14 & 15 – Rig & Skins

Spent a few hour hours getting to understand building an Armature (skeleton) in Blender. So many tools available by default and soooo many more can be made available as addons. If you have a cat mesh that needs to be boned, there’s a dozen ways to skin it. (couldn’t resist)

While digging around for videos on skinning, I came across this Blender character rig that has some killer animation options. Because of the custom control bones, I forgot I was watching a demo of Blender.

This lead me on a Blender rigging adventure, which revealed the following rigging websites.

Nathan Vegdahl – Cessen (rigger on Big Buck Bunny and author of Human Rigging DVD $30)
CGCookie’s Animation Toolkit – training series for character animation – $15
CGCookie’s FlexRig (character rig used in their Toolkit series)
Brian Tindall’s “Art of Moving Points” – iBook by Pixar rigger
Gord Goodwin – Author of the embedded “Nathan Rig” video above and admin at Rigging Repo blog, which includes a nice list of rigs, scripts, Blender artist websites and rigging tutorials like this:

Blender Days 11 & 12 – Materials, Cycles & L-Systems

Initially setup the materials for Blender’s default renderer and noticed that when I switched to the new Cycles renderer, I lost the materials.  A quick Internet searching revealed a handy addon called Convert Materials to Cycles.

The materials_cycles_converter.py  script created a set of buttons at the bottom of the Properties Editor in the Materials context. You can convert the current material or convert them all.  I’m using Blender 2.69 and the script, which is written for 2.71, worked good for me (color and bump came over).

VegGen_lsystem-1024x527

L-Systems was next up for exploration.

A question came to mind on whether or not the same beautiful branching could be created in Blender, as I had created previously in Houdini.  Searching revealed the VegGen addon, which I’m going to give a whirl (after some compositing and rigging tutorials).  Looks promising, though doesn’t have the ability to write my own turtle rules.  This doesn’t provide much control…   so probably simplest to just write an L-system engine in Python myself…  probably using the VegGen script as reference (Yay! Open source!).


other links:
Blender UI detailed breakdown
Blender.org forum
BlenderArtists.org forum

Blender Day 10 – 3D Cursor and Painting


Sidetracked by this Frankenstein texturing video, which shows an earlier version of Blender’s built in texture painting tool, which also performs cloning of photos right onto the 3D model.

Finally, I’ve realized I need help.  Learning on my own can be painful as software is never perfect. There are going to be pitfalls (bugs) and IRC and Blender forums can help me save time navigating known issues.  Going to linger on the #blender IRC channel for a few days to get a feel for the culture, before jumping in.

Blender – Day 9 – Cycles Render Engine


Who likes waiting?

I must confess that I was never a big fan of the rendering process. Clicking a button and then waiting minutes while an image (or portion of an image) appears, is… painful.

Perhaps it was all the years working in I.T.. I calculated it ounce, based on a few projects that I worked on. I spent over a year of my life staring at progress bars.

0%…. 10%…. 50%… 51%…. 52%…. 53%…

*passes out*


Blender

blender day 9 monkey in cycles
This brings me to Blender’s relatively new render engine, Cycles. Separate from Blender’s built-in render engine, this wonderful addition can create stunning lighting with photo real results…

… though don’t expect anything “photo real” coming from me anytime too soon, I’m still working to get there.

Blender’s Cycle render engine renders stuff on the fly, refining the render more and more, as time progresses. This is making it very simple for lighting setup.

Cycles can also utilize a GPU for faster render speeds, though installation of CUDA is required (for NVIDIA graphics cards). This isn’t something I’m going to mess with yet…   but double or tripling render speeds would be so so sweeeeeet.

Blender – Day 8 – rendering

Looking at this texture video and going to see what I can do in 2 hours. Full article is on BlenderGuru.

Later, use this to do some automatic corner shading.

And checkout the updates to this interesting point data transfer tool.

Blender – Day 7 – Rendering

Haven’t started messing with the new Cycles renderer yet, but have done some playing today with Blender’s default renderer.

The default renderer does have ambient occlusion and soft shadows, but light doesn’t bounce, so you have to be very creative and use a ton of lights to get the right look. Here’s my first tests, using some models I created using Blender’s modeling tools (which are fun to work with).

Oh yes. Learning a new 3D software is a humbling experience.

blenderDefault_render

Robotic Defenses

Currently looking at the latest robotic tech demo from Boston Dynamics (now owned by Google).

Remembering the classic film, “Runaway”, with Tom Selleck.

Plan to fend those buggers off with my own micro-robots using some open source technologies, like PIXY.

Make my own little spiders.

Maybe fool the gait recognition using some of the techniques outlines Doctorow’s book, “Little Brother”.

Speaking of which, CITIZENFOUR is a must-see documentary on Snowden.

Thx to Bobcat for the reminder.

Razer DeathAdder

Configuring my mouse on Linux hasn’t been too important as I tend to be using my mouse on a desktop computer. More desk space means more elbowroom to move around, so I don’t do anything fancy with the mouse “acceleration”.

However, working on a laptop changes this because I’m typically working with limited space. To maximize efficiency, slow movements should be more accurate, easing (for example) the selection of text. Quick movements can jump the cursor to the other side of the screen without having to pull the mouse off the mousepad.

Another thing I had to accommodate for (while using a laptop) is that I usually have different devices plugged in, at different times. This means that the device ID changes, depending what is plugged in. This makes it a pain in the arse to automate.

This line lists the devices and then greps the lines to find the ID of the Razer Mouse.

razer_mouse_id=$(xinput | grep -m 1 "Razer Razer DeathAdder 2013" | awk {'print substr($7,4,2)'})

These lines then use the newly created $razer_mouse_id variable and sets up my deceleration settings. “Constant Deceleration” sets the overall speed (fastest speed), while “Velocity Scaling” sets the polling speed, how often we check (poll) the position of the mouse. The “Adaptive Deceleration” then determines just how much we effect the sensitivity of the mouse down when it’s moving… slowly (if I’m understanding this correctly).

In any case, these are the settings that are working for me… for now.

xinput set-button-map $razer_mouse_id 1 2 3 4 5 6 7 2 2

xinput --set-prop $razer_mouse_id "Device Accel Constant Deceleration" 1
xinput --set-prop $razer_mouse_id "Device Accel Adaptive Deceleration" 2
xinput --set-prop $razer_mouse_id "Device Accel Velocity Scaling" .5

Blender – Day 6

Setting up a new Linux build w/ Ubuntu 14.04.

Have you tried it yet? Imagine booting from a USB stick and being able to test drive Linux. Without even having to install Ubuntu Linux, I was able to connect to my local library’s WiFi, read my Gmail and use my Wacom tablet. I then double-clicked the “Install Ubuntu” icon that was sitting on my desktop and let the installer run in the background…   as I continued to browse the internet.  If you haven’t yet, I recommend trying it.

I’m not a big fan of the Unity user interface, which is the default UI for recent versions of Ubuntu. However, installing Gnome Classic was stupid easy *clicks button*. This style of UI is more comfortable for most users.

Next, I’m testing out the graphics card using the Sintel character rig in Blender.  All looks good, and we’re mobile!

Oh yeah… isn’t this supposed to be about Blender?

To finish off the day, I felt I should actually create something…  anything. Why not follow a geeky trend on 3/14 and pay tribute to Pi?  I followed this tutorial and was able to being in an SVG file to extrude in to a 3D shape.  Not incredibly impressive, but for those that are spooked out about 3D softwares…   well, I say, “Ave no fear!  Iz EZ!

piBlender

Blender Tutorial Collections 1

33 Brilliant Blender Tutorials

…including”


45 Epic Blender Tutorials

…including:

Tax time for me, which has to take priority. Plan on putting a bit more time tonight into testing out what I’ve learned by dumping a image online, no matter how crude it might look! o_O


Almost forgot!  Should have mentioned the obvious. There’s also a collection of tutorials right on the…

Tutorials on Blender.org


Blender Day 3

Saturday I spent some time with Frank, going through some modelling basics for about 30 minutes. The more I see, the more I like in this program. I’m staying open, and learning to accept the differences, focusing on what I’ve gained.

Already, the forced workflow difference is showing benefits. Some very intuitive gems scattered all over the place. “Ahhh…  freshness.

I just watched and really liked Darrin Lile’s intro to Blender. Nice light little walk, that covers a lot of basics in only 10 minutes. His narration is super-clear.

Today, I was learning camera navigation and was very impressed by all the options in which one can setup their cameras.  Pressing alt+b, then dragging a selection box over the viewport, in order to determine what objects are visible…   is odd and beautiful.

Capturing Movement w/ Connections Overlayed

Was just introduced to this…

…and through watching this…

…am guessing they used Brekel and for sure they used Houdini.

Blender – Everyday – Day 1

IMG_3132

Talking about it enough, but time to “put my money where my mouth is”. I will never really know just how viable Blender is as a base 3D animation software, till I try it.

Once per day, for about 2 hours, I will invest time into learning Blender. One I get the basics down, I will challenge myself to producing sharable artwork.

Here’s some inspiration to drive me. Blender is no longer just a hobbyist’s 3D animation software…   and hasn’t been for some time. Seems that “first world” countries are the slowest places to catch on to a growing trend.

Started with some interface basics here.

Test Renders in Arnold / Maya

Some digital landscapes from Lee Griggs, rendered in Maya with the Arnold rendering engine.

leeGriggs

A TON more can be seen here, just make sure and full-screen them.

© 2024 Jer's Life

Theme by Anders NorenUp ↑